A Beginner's Guide to MetaMask

The time has come. You’re tired of being dunked on by Bored Apes, SupDucks, and Krazy Koalas. You're ready to buy your first NFT. But before you can do so, you'll need to have a way to store your NFT and hold the currencies, like Ether, responsible for buying them. The most popular way to store ETH and interact with decentralized applications is through the browser extension wallet, MetaMask. In our comprehensive guide to MetaMask, we’ll teach you how to set up, fund, and use MetaMask to send ETH and interact with decentralized applications on Web 3.0, preparing you to buy your first NFT. You can also find these steps broken down on video at the Lucky Trader YouTube channel!
How Do I Set Up MetaMask?
MetaMask is a browser extension wallet that allows you to easily access and interact with decentralized applications or dApps.
To start, you’ll need to visit the extension store for the browser of your choice and search for “MetaMask" or visit MetaMask.io.
For those using Google Chrome or Brave, the result should look something like this…
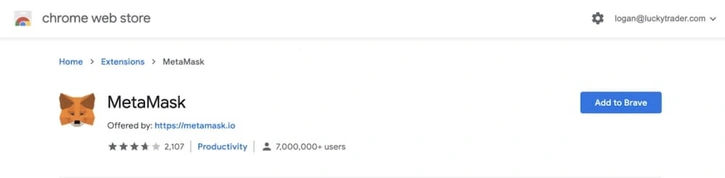
Note: It’s important to ensure that the extension you’re adding is being offered by “https://metamask.io.”
When you're done adding it to your browser, it’s time to start setting up your wallet.
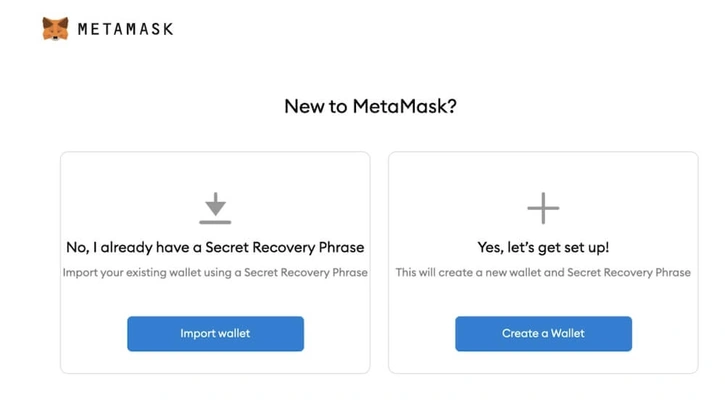
After clicking “get started,” it’s time to decide if we want to set up a new wallet or restore an old one. If you’ve already set up a MetaMask wallet, and have your recovery seed phrase, you can select “import wallet.”
How to Restore an Existing MetaMask Wallet
If you have your seed recovery phrase handy and are looking to restore an existing MetaMask wallet, select "import wallet."
This brings you to a simple screen where you can import the words from your secret recovery phrase and create a new password for your wallet.
When inserting your secret recovery phrase, be sure to include spaces between the words you're inputting.
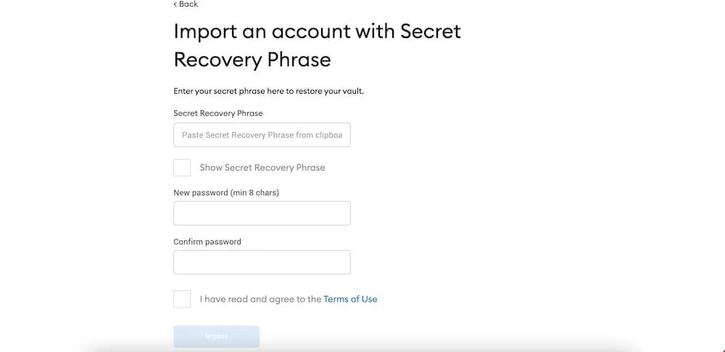
After filling out the required fields and hitting "import," your wallet will be restored.
It's important to note, that when you restore a wallet on a different device or a new browser, your contents will always remain the same. Restoring a wallet does not "reset" the account, but merely allows you to gain access to the account from a different setup.
Be sure to store your secret recovery phrase offline and in a secure location in case you need to recover your wallet in the future.
How to Create a New MetaMask Wallet
If you’ve never used MetaMask before though, you’re going to need to select “create a wallet.”
After selecting “create a wallet,” we get to the most important parts of wallet creation. In the next two steps you’ll be responsible for setting a password for access to your wallet, as well as generating the recovery seed phrase for your wallet.
Securing Your Wallet: Password
Unlike most application logins, you won’t be able to simply email yourself a forgotten password link. It is of the utmost importance that you first create a secure, unique password for your MetaMask wallet. Please make sure to store this password securely, perhaps using a password manager or offline in a secure location like a safe.
Your password is your first line of defense to your wallet. If someone has your device and your password, they would be able to login in and access the funds and NFTs that are present within your wallet.
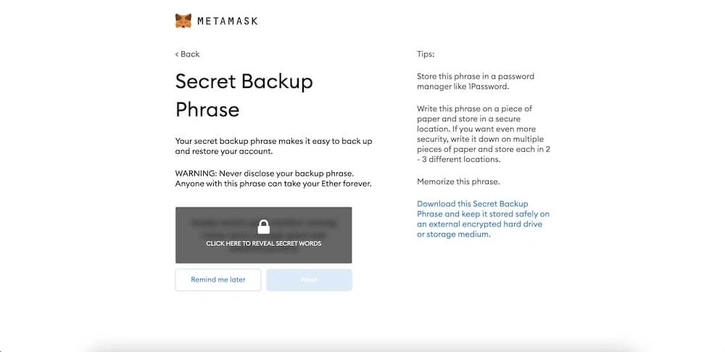
Securing Your Wallet: Secret Recovery Phrase
The secret recovery phrase, also referred to as the seed recovery phrase, is one of the most unique parts of interacting with cryptocurrencies and blockchains. Your secret recovery phrase is a string of typically 12 words that pertains to a specific private key and can be used to generate public keys or addresses. You can learn much more about the technical details of mnemonics and secret recovery phrases here.
Simply put, your secret recovery phrase is the foundation of your wallet and wallet contents. If you happen to forget your password, the first line of defense, your recovery seed phrase will allow you to restore access to your wallet and all that is inside.
This also means that if the device you’re utilizing is damaged or lost, with your secret recovery phrase you can restore your wallet and contents on a different device. Therefore, anyone who has access to your secret recovery phrase could simply restore your wallet on their own device and take the contents for themselves.
Much like you wouldn’t share passwords, DO NOT share your recovery seed phrase with anyone. It’s good practice to store it offline in multiple, separate, secure locations.
After securely recording and storing away your recovery seed phrase, your wallet is ready for use!
Advanced Wallet Security (Recommended): Connecting to Hardware Wallet
While securely storing your password and secret recovery phrase offline is a great first step, it is possible to get even more secure when interacting with Web3.0.
Most participants do this through the connection of MetaMask with a hardware wallet. Sometimes referred to as cold wallets, a hardware wallet is a device that lives “offline” and safely and securely encrypts your private keys locally on the device.
This brings additional protection to users as it becomes necessary to have physical access to the hardware wallet to perform transactions like sending NFTs or ETH. Otherwise without a hardware wallet, clicking a bad link from a malicious actor or falling victim to a keylogger attack (recording the keys you’ve typed) could give them access to your funds.
To set up a hardware wallet with MetaMask, you’ll first need to purchase one. Some of the most notable and reputable hardware wallets are Trezor and Ledger, and at present time these are the only hardware wallets compatible with MetaMask.
Note: It is important to always verify you are buying your hardware wallet directly from the manufacturer. Purchasing through a secondary marketplace puts you at risk for operating with a compromised device.
After you’ve purchased and set up your hardware wallet (similar in steps to setting up your MetaMask wallet), you can connect your hardware wallet to your laptop or desktop computer and follow the steps below.
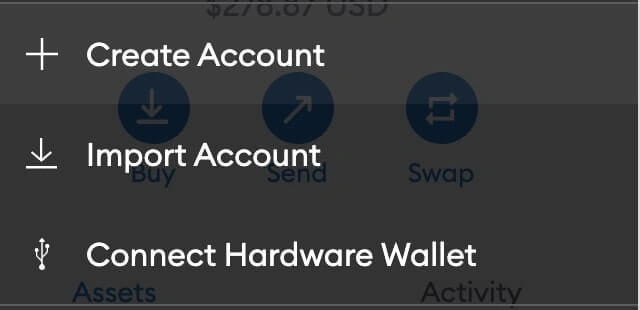
First login to MetaMask, and click the top right circle and select “connect hardware wallet.”
Next, you’ll choose which hardware wallet you wish to connect.
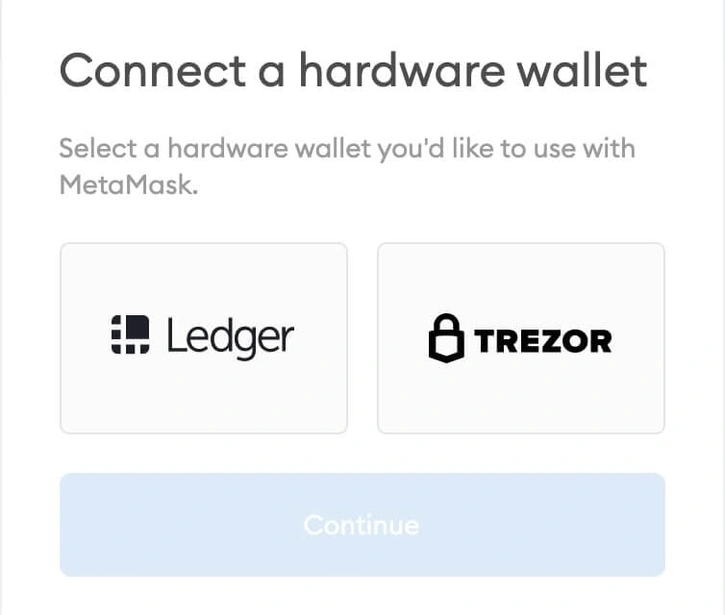
If your wallet is successfully plugged in, you’ll hit “continue,” where you’ll be able to select the account and connect your wallet.
When it is all said and done, you’ll see your hardware wallet account in the dropdown of available accounts within MetaMask!
How to Find Your Ethereum Address
So you’ve got a MetaMask wallet, but nothing inside. Maybe you bought some Ether on Coinbase during the 2017 bull market. Maybe you have a generous friend who wants to send you some to get started.
Either way, you’ll need to know how to access your Ethereum address to be able to receive funds.
When opening your newly acquired MetaMask wallet, you can find your Ethereum address (a long string of letters and numbers, starting with 0x) at the top.
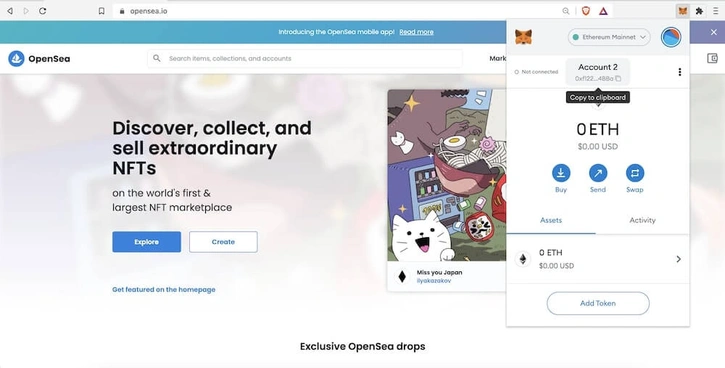
Because of the length of addresses, it’s often most easy to identify an address by a few characters from the beginning and end of an address. To unveil the entire address though, you can simply hover over the characters, and click to copy the address to your clipboard.
The full result is your Ethereum address. You’ll need this address if you wish to be able to receive ETH or other ERC-20 tokens from an exchange such as Coinbase.
How do I send ETH with MetaMask?
After you’ve got your wallet secured and have received some ETH, it’s time to learn how to send it.
With ETH in your wallet, you can select “send” from the opening screen on MetaMask.
That will prompt you to establish a recipient address. Simply put, where would you like to send ETH?

Here, we’ve decided to send some funds back to the Lucky Trader wallet.
If this is the first time you’re sending to an address, but you expect to use it in the future, you can add the recipient to your address book! This can help avoid silly copy and paste mistakes in the future.
After you’ve selected your recipient, it’s time to decide how much you want to send.
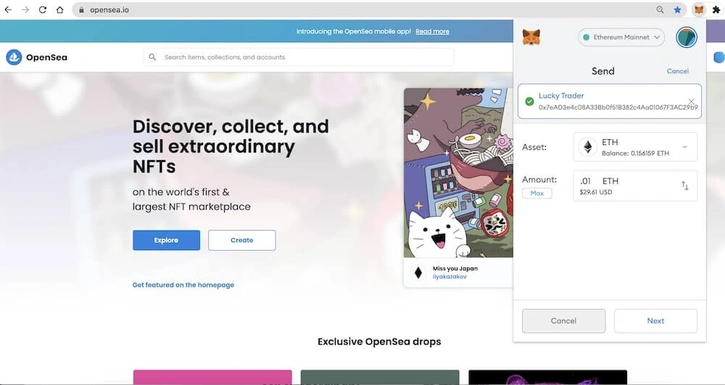
Once you’ve decided how much to send, click “next.”
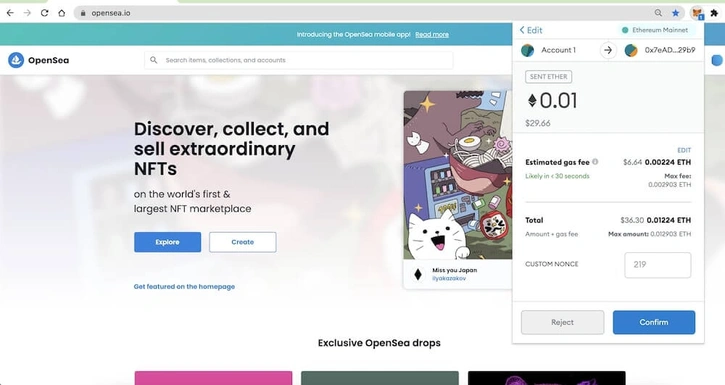
In this example, we’ve selected .01 ETH, but you’ll notice that the total transaction is a bit more than .01 ETH. This is because a transaction requires a “gas” fee to be pushed to and confirmed on the blockchain. The amount of gas you submit in a transaction can be edited (see steps below), but in this instance, we’re comfortable with the estimated fee and the probability of confirmation in less than 30 seconds.
Note: The initial fee estimation given by MetaMask is based on the current network activity and base fees on the Ethereum blockchain. MetaMask fees are no higher than other wallets as they use a compilation of multiple gas estimators to determine the appropriate fee at the time of transaction.
Once the confirmation is confirmed, you're all done!
Congrats, you’ve sent ETH!
You can repeat this exact process for sending any other ERC-20 tokens that may reside in your Ethereum wallet.
Advanced: How to Edit Gas Settings
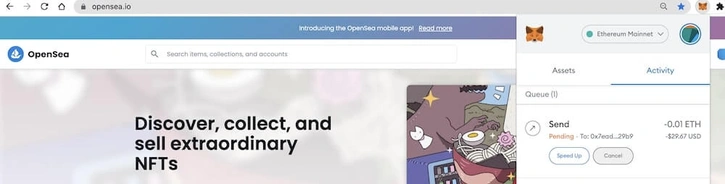
There may be a time when you want to speed up a particular transaction and not be at the mercy of MetaMask’s gas estimation. One such popular example is when you are trying to mint a brand new NFT project against thousands of other users at drop time.
If you merely accept the estimation of the MetaMask network, it is unlikely that your transaction will beat the thousands of others being populated at the same time.
Remember, gas fees are a result of demand on the network. As more people create a transaction during a select time, the higher the gas prices will go. The transactions with higher gas fees have a greater likelihood of success, as they will be picked up by the miners before those sent with lower fees.
There are two simple ways we can modify a transaction's gas fee in MetaMask before confirmation.
Editing Gas Settings: MetaMask Defaults
The easiest way to edit a gas fee before sending a transaction, is to defer to MetaMask’s speed estimations at a select time. Before confirming a transaction, if we select “Edit” in the gas fee section, we are taken to the following screen.
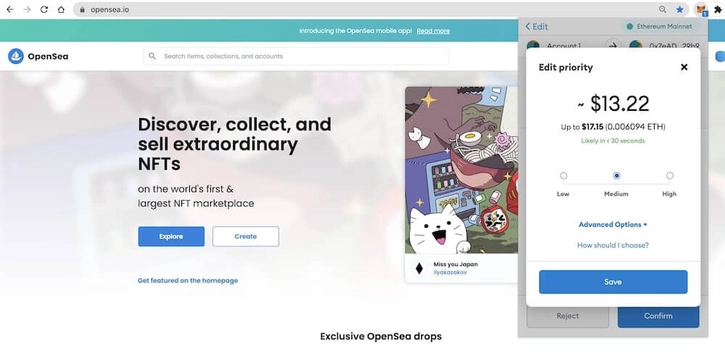
We now have the option to choose “slow, medium, or fast” gas settings for the respective transaction. While slow or medium may be sufficient if you are in no rush or are merely sending ETH to another account, when minting an NFT during a rush, neither of these options will be suitable.
MetaMask breaks down their default selections as follows:
High: This is best for swaps or other time sensitive transactions. If a swap takes too long to process it will often fail and you may lose funds.
Medium: A medium gas fee is good for sending, withdrawing or other non-time sensitive but important transactions.
Low: A lower gas fee should only be selected for transactions where processing time is less important. With a lower fee, it can be hard to predict when (or if) your transaction will be successful.
Editing Gas Settings: Advanced Manual Entry
Oftentimes during a highly-demanded drop, not even the “fast” setting on MetaMask’s defaults will be enough for a transaction to be pushed through successfully. Therefore, we’ll need to take matters into our own hands.
By selecting “advanced options” we can now manually set a “gas limit,” “maximum priority fee” and our “maximum fee.”
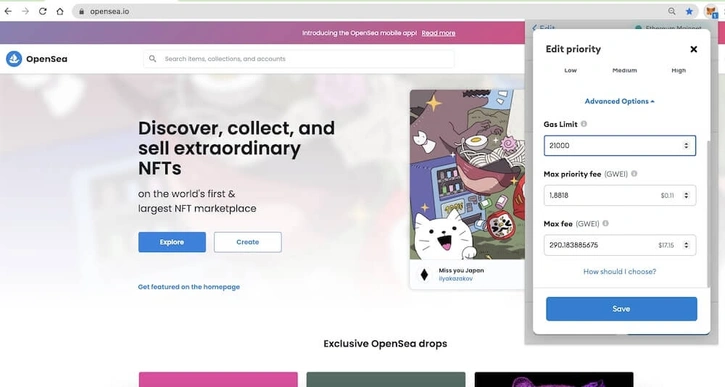
Note: This is an advanced feature only. Please practice editing a few times in low-risk settings to avoid a financially damaging mistake.
So, tell me more about gas, and these settings?
Base Fee: This fee is determined by the Ethereum protocol and is the minimum amount of gas that can be used to create a transaction during a specific block. During a transaction, this fee gets burned (destroyed).
Gas Limit: This is the maximum amount of gas that can be used in a transaction.
Max Priority Fee: A “priority fee” is a tip to the miners. Since the implementation of EIP-1559 (see our glossary for more), users can “tip” miners to try to get them to process their transactions faster. Much like the traditional gas fee, the higher the tip, the greater the likelihood your transaction is picked up before others with a lower priority fee.
Max Fee: The maximum fee is the highest amount a user is willing to pay for a particular transaction. This amount includes both the gas fee and the priority fee (miner tip).
Notice here, users are setting a “maximum fee” they are willing to pay for a transaction. Therefore, if we edit our “max fee” to 150 gwei (a unit of ETH), that does not mean the transaction will consume all 150 gwei.
Instead, the user will be returned the difference of the “max fee” and the “base fee” + “priority fee.”
For example if we set a max fee of 150 gwei...and the transaction occurs with a “base fee” of 50 gwei and a “priority fee” of 50 gwei, the additional 50 gwei will be returned.
For more technical details about gas and the recent changes of EIP-1559, please refer to this guide from Ethereum.org.
Advanced: How Do I Know What Gas Prices to Use?
So now you know how to edit gas fees and limits, but how do you know what gas price to use?
As noted above, the gas price and base fees per block fluctuate based on the demand on the Ethereum blockchain.
Thankfully, we never need to guess which price to use, because tools like gasnow.org and ethgasstation.info provide us with real-time views into the current gas prices.
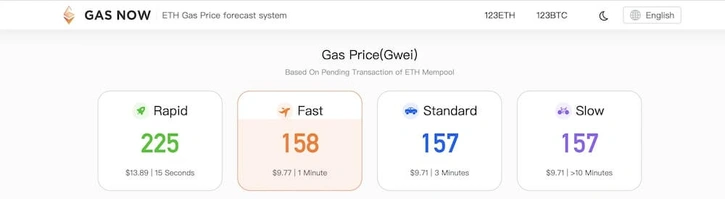
These sites will recommend a gas price based on current conditions, allowing us to identify what priority or maximum fee (in gwei) we wish to use at a particular time.
How Do I Interact on web3 with MetaMask?
Now that you have a MetaMask wallet and can send ETH, it’s important to understand how to use MetaMask to interact with decentralized applications. You can find our guide to interacting with specific dApps, like OpenSea, here.
We’re going to show you how easy it is to interact with and connect to trusted NFT projects and resources.
Note: Connecting your wallet to unknown sources introduces risk. Please be sure to only connect to sites or sources you trust.
In this example, let’s assume you want to start learning and participating in Zed Run, the digital horse racing ecosystem. A friend sends a horse to your wallet to get you started and being the savvy stable owner you are, you want to gather more information about your horse and new stable.
Therefore, you do what everyone should do when they start with Zed Run….you head to KnowYourHorses.com, the premier destination for all Zed Run analysis.
Disclaimer: KnowYourHorses.com is a Lucky Trader product.
Once at Know Your Horses, the site recognizes your MetaMask extension, and offers you a “login” option.
Upon clicking "login," your MetaMask wallet should automatically populate.
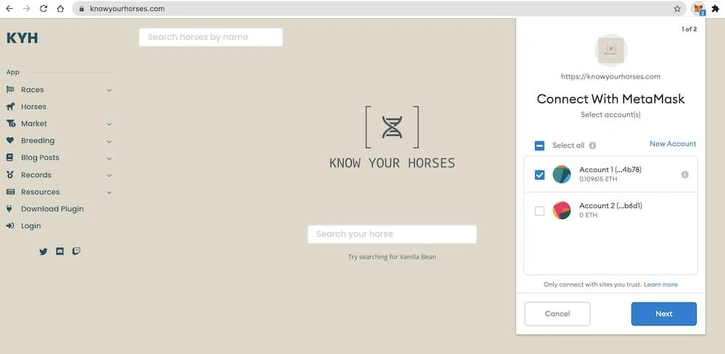
If you’re logged into your MetaMask, it’ll present you the option to choose which account you’d like to connect to Know Your Horses. After selecting the account you’d like, you’ll need to verify you’re granting permission to Know Your Horses to view your public Ethereum address.
Reminder, only allow this for trusted sites!
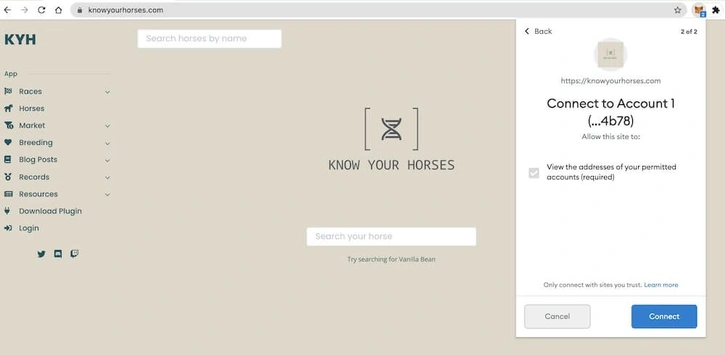
Once you’re connected, you’ll be required to sign a transaction to kick off the session. And then you’re in!
Note: In many instances, it will not be required to sign a transaction to finalize logging in.
Now you’re connected to a site on Web 3.0!
This process will be the most common “login” process for interacting with decentralized applications (dApps) and Web 3.0. Unlike Web 2.0, it is no longer necessary to keep track of hundreds of emails and passwords. Instead, we can use our single wallet with any and all compatible sites.
While MetaMask is the most popular Web 3.0 wallet, it is not the only wallet provider that can grant you access to Web 3.0. Other popular wallets like Trust Wallet, Rainbow Wallet, Coinbase Wallet, and more will give you the same opportunities!
Now that you can connect your wallet to dApps, you’re ready to explore Web3.0!
How Do I Know Which Sites I’m Connected To?
If you ever want to verify connection, or check what other sites you may be connected to, you can select the ellipse at the top of your wallet and choose “connected sites.”
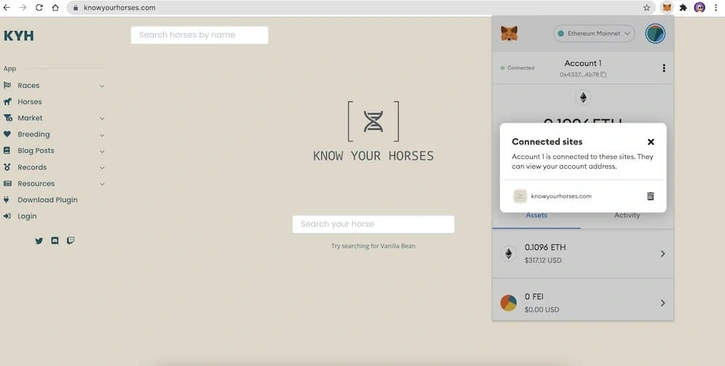
To disconnect, simply click the trash can icon.
It is good practice from time to time to disconnect yourself from sites that you don’t interact with frequently.
See something that's missing from our comprehensive MetaMask guide? Reach out to us at info@luckytrader.com and we'll be sure to get it updated!