How To Use Etherscan More Effectively in 4 Ways

Have you ever needed to revoke token approvals from your wallet? Have you ever wanted to learn how to mint an NFT directly from its contract?
Or maybe you have been stuck waiting for your NFT to reveal from a newly minted project, but OpenSea will not load the image.
Etherscan, Ethereum’s leading blockchain explorer, lets you do all three. Below, we'll walk through how Etherscan can be utilized to revoke token approvals, create wallet watchlists, mint from contract, and find images and metadata for revealed NFT projects.
How To Revoke Token Approvals on Etherscan
With the recent incident of a scammer/hacker being able to access some people's wallets and transfer their NFTs out of their wallets, it is important to know how to protect your assets to mitigate the chance of this happening to you.
Understanding what contracts have access to the NFTs and Tokens you own is vital in protecting your assets in the instance that your wallet ever gets compromised.
Before diving into how to review token approvals, it is imperative to note that we must stay vigilant in knowing what we are approving anytime we sign or confirm a transaction through Metamask, to ensure that we are not allowing malicious contracts the ability to access our assets.
Below is a step-by-step guide on how to access and use the Etherscan Token Approval tool.
- Go to https://etherscan.io/tokenapprovalchecker
- In the search bar type you wallet address or ENS domain to pull up your wallet
- Once pulled up you will see three different tabs representing different token types: ERC-20, ERC-721, and ERC-1155
- The ERC-20 tab identifies all ERC-20 tokens in your wallet that have some type of token approval active, what contract is approved to spend each token, and how much of teach token they are allowed to access
- The ERC-721 tab may appear blank at first. You will want to enable “By Contract” to view all NFT collections created using an ERC-721 contract that have a token approval active.
- The ERC-1155 tab identifies all NFTs created using an ERC-1155 contract that have some type of active token approval.
- To revoke access to any of your tokens, you will need to connect your wallet to Etherscan. Underneath the search Token Approval Checker search bar is a button that says “Connect to Web3” that you want to click. The typical Metamask popup appears to approve connecting to Etherscan. Once connected, you will want to find the token that you want to revoke approvals for and click the “Revoke” button in blue to the right. Another Metamask popup will appear to initiate a transaction to remove the token approval from the listed Approved Spender.
How to Create a Watchlist on Etherscan
While there are a few different apps and sites that allow people to track other people’s wallet activity, a decent cost-free option is utilizing Etherscan’s Watch List feature.
Etherscan allows you to follow up to 25 wallets and receive email notifications whenever there is a transaction from a tracked wallet. You can even filter the type of transactions that you receive notifications for between incoming, outgoing or both types of transactions.
Below is a step-by-step guide on how to set up a watchlist on Etherscan. (If you have not created an account on Etherscan before, you will need to do so for this feature.)
- After logging into your Etherscan account, go to “My Profile” and click on “Watch List” on the left-hand side of the page.
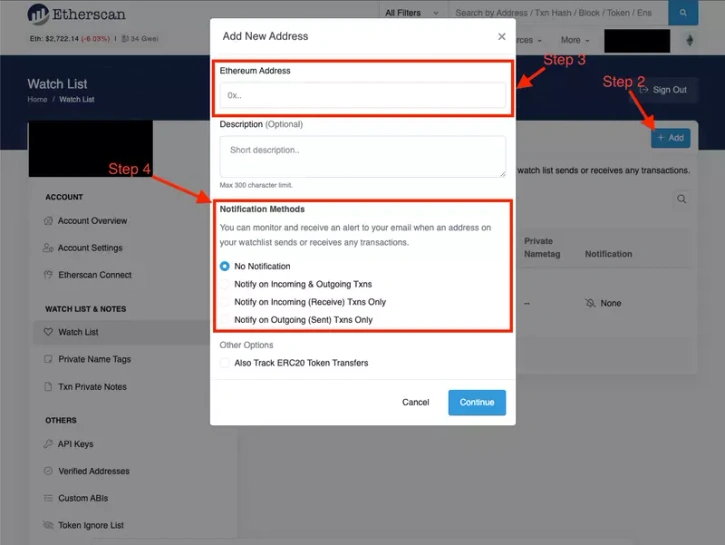
- Click “+ Add” on the top of the page to add a new wallet to your watchlist
- A popup will appear where you will be able to input the wallet address of the account you want to track. You can add a description as well to help identify the name of the wallet that you are adding to your watch list.
- Choose whether you want to receive notifications on wallet activity, whether it be notifications for incoming, outgoing, both types of transaction, or no notifications. You can also choose to track ERC20 Token transfers for the wallet you are tracking.
- Once complete, click “Continue” and the wallet will be added to your Watch List.
How to Mint on Etherscan from Contract
With the number of scams and fake websites for projects, knowing how to mint from contract is an essential skill to mint projects safely without having to connect to possibly malicious sites.
While minting from a contract is not completely safe because contracts can still have malicious code, it is at least safer than having to connect your wallet to an additional website.
A step-by-step guide to minting from contract on Etherscan can be found below.
- Once you have the contract address of the collection you want to mint (which can be found from a verified official post in a projects discord usually, or by using OpenSea to find the project collection and using the details drop-down from an NFT in the collection to go to the contract page on Etherscan), you can paste the contract address into the search bar on Etherscan.
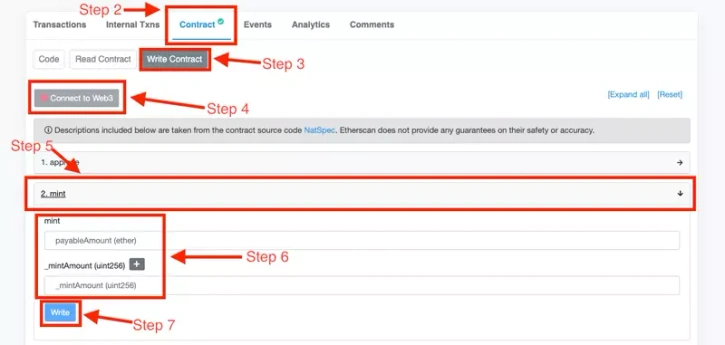
- Once you are on the contract page, click on the “Contract” tab
- Click on “Write Contract”
- Click on the “Connect to Web3” button and proceed to connect your wallet to Etherscan
- Find the line that has a mint function and click it. The name of this line will not always be the same and typically differentiates between public and whitelist mint.
- There will be a few lines to fill out, mainly “mintToken” and “amount”.
- On the “mintToken” line you will input the total mint price of the NFT(s). If you are minting more than one then you will have to add the total cost based on the amount you are attempting to mint. IE if the mint price is .01 and you are minting three NFTs, you would input .03.
- On the “amount” line you will input the amount of NFTs you are attempting to mint
- Note: If there are additional fields, like “signature”, then you will have to mint through the project website as that is something that is provided from your transaction on the website and is not the same for each person.
- Click “Write” and you will be prompted with a typical Metamask pop-up to complete your transaction.
How to Find an NFT's Metadata on Etherscan
It often happens during project reveals where NFT holders click to refresh their metadata to reveal their NFT, but are left waiting until OpenSea’s server can get that metadata and update it on their end to reveal the NFT.
While not every projects’ images and metadata are stored the same way, people can utilize Etherscan to find NFT metadata and images once project reveals are started. Below is a step-by-step guide outlining how to find metadata and images through Etherscan.
- First, you want to go to the project’s contract on Etherscan. This can be done by clicking on the “Details” dropdown on an NFT from that project and clicking on the contract address link.
- Click on the “Contract” tab on Etherscan
- Click “Read Contract”
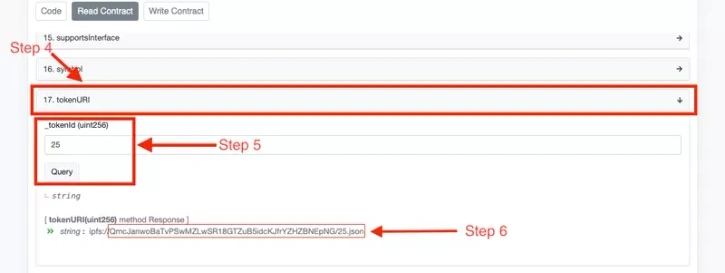
- Find the field that says “tokenURI” and open that
- Input the Serial Number or Token ID of the NFT you are trying to see the metadata/image on and click “Query”
- Copy the entire url provided and paste this into your search bar
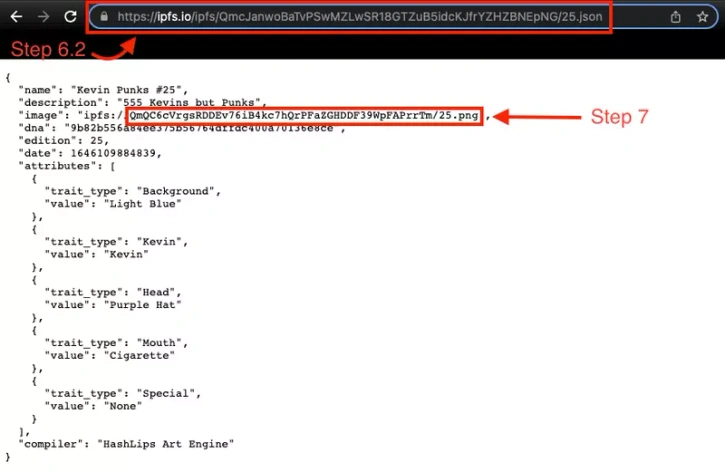
- This provides you with the underlying metadata of the NFT you were searching for in JSON format.
- If the metadata is hosted on IPFS, you will need to copy the text after “ipfs://”, and paste it to the end of the web address HTTPS://ipfs.io/ipfs/PASTE TEXT HERE.
- To view the image associated with that NFT, there is an item in the JSON output that says “image:” and has a link. Sometimes this link is an IPFS link, sometimes it is hosted on the project’s own server.
- In the case of the link NOT beginning with IPFS, you can copy and paste this into your search bar to pull up a page with the NFT image.
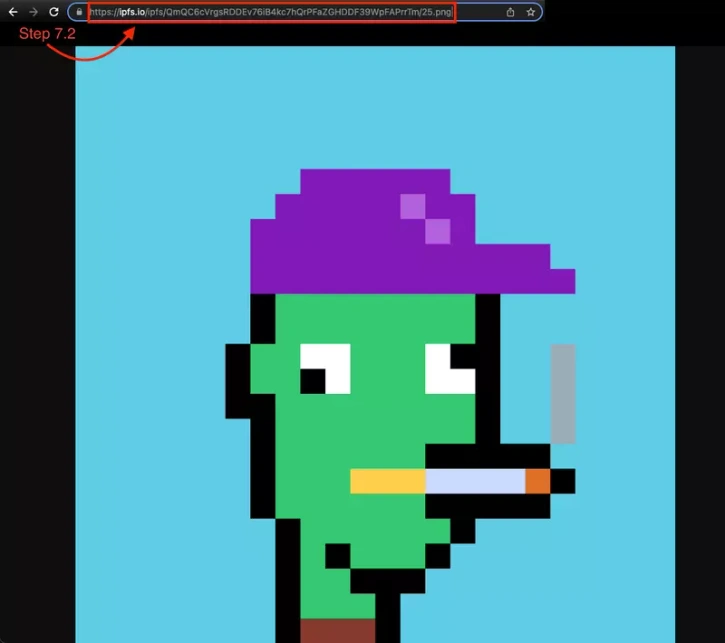
- If the image is hosted on IPFS, you will need to copy the text after “ipfs://”, and paste it to the end of the web address HTTPS://ipfs.io/ipfs/PASTE TEXT HERE. This will pull up the image of the NFT.