How to Build a Simple ERC-721 Contract

There are multiple ways to enter the world of NFTs. You can buy and trade, collect, invest, and create NFTs.
In this guide, we will walk you through how to build a simple ERC-721 contract. ERC-721 is the universally accepted standard for NFT smart contract creation.
If you have no programming experience don’t worry, you should be able to follow along and create a simple NFT contract even if you have never coded before.
When writing an ERC-721 contract, we'll be using the Solidity programming language. Solidity is an object orientated high-level language for implementing smart contracts.
To begin, we'll show you how to write a simple smart contract and then deploy and run the contract on a test network.
How To Set Up a Development Environment
An easy way to get started is to use the Remix editor. Remix is an online editor that allows you to code, debug, compile, and even deploy and run your smart contracts to test nets as well as the Ethereum main net. You can access Remix here.
Once there, highlight the contracts folder, right click, and choose "New File."
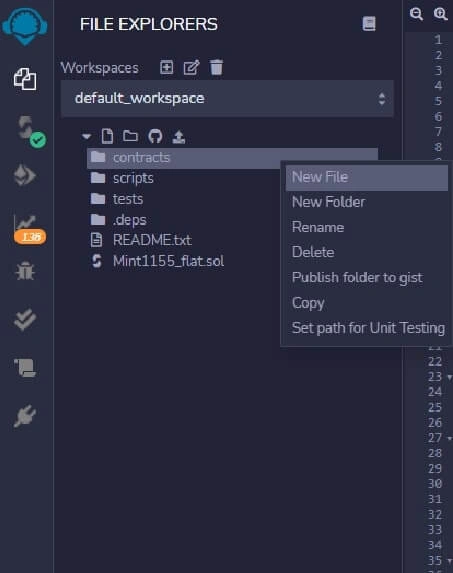
Name this file anything you want, but it must end in the .sol extension to be recognized as a Solidity file, for example luckynft.sol.
How to Start Your ERC-721 Contract
To get started, we'll first type or paste the following two lines:
// SPDX-License-Identifier: MIT
pragma solidity ^0.8.2;
The first line is your license file. A license file can appear anywhere in the file, but standards dictate you put it at the top.
The MIT license above means this code is open source and available for use. If you do not want to specify a license or make your code open source you can use the special value, UNLICENSED.
The second file designates the version of Solidity you would like your file to be compatible with. In this case our file will be compatible with compilers 0.8.2 and up until the next major release (hence the ^).
Also please note going forward that every executable line in Solidity will end with a semicolon.
How to Import Statements from OpenZeppelin
Next we're going to add import statements from OpenZeppelin by importing the following three lines of code.
import "@openzeppelin/contracts@4.3.2/token/ERC721/ERC721.sol";
import "@openzeppelin/contracts@4.3.2/access/Ownable.sol";
import "@openzeppelin/contracts@4.3.2/utils/Counters.sol";
The three lines of code above are import statements. They will pull in code from the OpenZeppelin library and save us a lot of typing when we inherit from the ERC721, Ownable, and Counters libraries.
OpenZeppelin libraries are the gold standard for battle tested open source modules in the Solidity world. Most Solidity contracts have OpenZeppelin import statements because the code is audited, community tested, and reviewed. There are a few more steps required to use these in normal development environments, but when using Remix the import statements are all you need. We will cover this in more detail in future tutorials.
The first line, which refers to the ERC721 library, is the library of code required to create a standards compliant non-fungible token (NFT). It has multiple optional extensions and is spread across a number of contracts.
Secondly, the Ownable library is the library of code that allows for ownership of the NFT you are creating. By default, the owner of an Ownable contract is the account that deploys it. Ownable also allows you to transfer ownership via the transferOwnership function and allows the administrator to relinquish ownership via the renounceOwnership function.
Lastly, the Counters library is the library that provides a simple way to get a counter that can be incremented or decremented. This is useful for ID generation, or keeping a count of any thing or activity.
After adding the import statements, we can add the following lines of code:
contract LuckyTrader is ERC721, Ownable {
using Counters for Counters.Counter;
These lines designate the name of the contract as LuckyTrader (you can call this whatever you want) and inherit from the ERC721 and Ownable smart contracts we imported above. The { is used to contain a block of code for a contract or function. For it to function correctly, it must have a corresponding closing bracket } . Finally, using Counters for Counters.Counter; is initializing the Counter function so we can make use of it later in the contract.
Next add the following code snippet.
Counters.Counter private _tokenIdCounter;
This line of Solidity uses the Counter function to initialize the _tokenIdCounter variable, which we will use to keep track of the individual tokens. Since non-fungible tokens are unique, they must each have their own ID.
How to Initialize Your Smart Contract
After working through the counters, we'll need to initialize our smart contract. To do so, add the following line.
constructor() ERC721("LuckyTrader", "LKYTR") {}
A constructor is a block of code that is run once and only once in a Solidity smart contract. Usually placed at the beginning of the code, it is used to initialize the contract state. In the above block of code we are designating the name (LuckyTrader) and symbol (LKYTR) of the NFT we are creating.
Finally, we'll add one last code snippet.
function safeMint(address to) public onlyOwner {
_safeMint(to, _tokenIdCounter.current());
_tokenIdCounter.increment();
}
}
Function safeMint is a function that will allow you to safely mint a new token. It is actually inherited from the ERC721 base function we import from OpenZeppelin library at the beginning of our contract. If the token ID already exists the function will revert.
The line (to, _tokenIdCounter.current()); means that the token will be minted to the address provided when the function is called, and the tokenIdCounter.current will make sure the next available token ID is used for this new token so they are created in the proper order.
The tokeIDCounter.increment(); will increment the tokenIDCounter so the ID being used for the current mint is not used on the next token minted.
That is it! You have created your first Solidity smart contract.
The next step is to compile the program and check for errors.
How to Compile Your Smart Contract
Next we'll need to compile our smart contract. Compiling is the act of taking our code from human readable form, into machine readable form - ones and zeros.
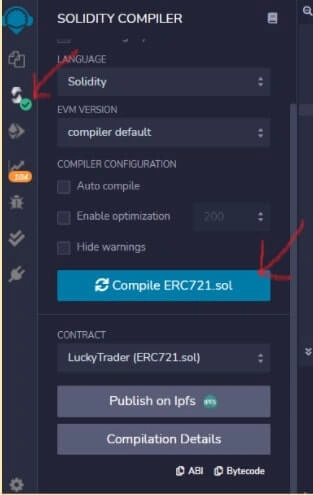
You can compile your smart contract by clicking on the compiler button just below the file structure button.
This click will display the screen shown below. The red arrows point out where the button is to display the compiler screen as well as the compile button you use to run the compiler. When you are here click the "Compile" button. If your compile is successful you should get a green checkmark as shown below:
Once you have a clean compile you can deploy and run your smart contract.
How to Deploy Your Smart Contract
Next, we'll need to deploy our smart contract. Deploying is the act of moving our contract into production. When doing so in this example, this means putting our code onto a "test blockchain." However, when deploying a final version of the smart contract, we could push it into production on the Ethereum blockchain!
Remix gives you three options to deploy. You can view these options by clicking on the "Deploy" and "Run Transactions" buttons.
The three environment options for running transactions are:
JavaScript VM: All the transactions will be executed in a sandbox blockchain in the browser. This means nothing will be persisted when you reload the page. The JsVM is its own blockchain and on each reload it will start a new blockchain, the old one will not be saved.
Injected Provider: Remix will connect to an injected Web3.0 provider. MetaMask is an example of a provider that injects Web3.0.
Web3.0 Provider: Remix will connect to a remote node. You will need to provide the URL to the selected provider: geth, Parity, or any Ethereum client.
For our purposes, we'll choose JavaScript VM:
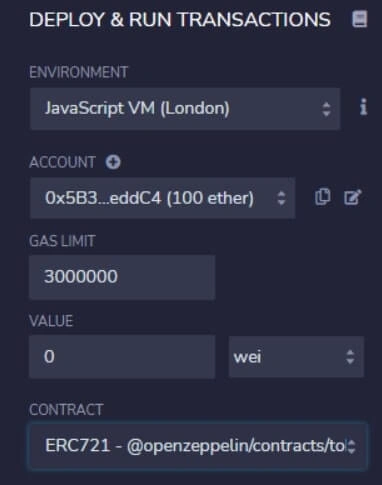
You do not need to change the information in the account window. This is an account provided for you in the Remix sandbox. The JsVM provides five different accounts for your usage.
Additionally, we can leave the gas limit as the default amount as well. Leaving the gas limit at the default will set the maximum amount of gas that will be allowed for the transactions created in Remix.
Lastly, we can leave "Value" empty as well. The "Value" box defines the amount of ETH, WEI, or GWEI that is sent to a contract or payable.
After we make sure our contract is the one selected in the contract box, we can click "deploy."
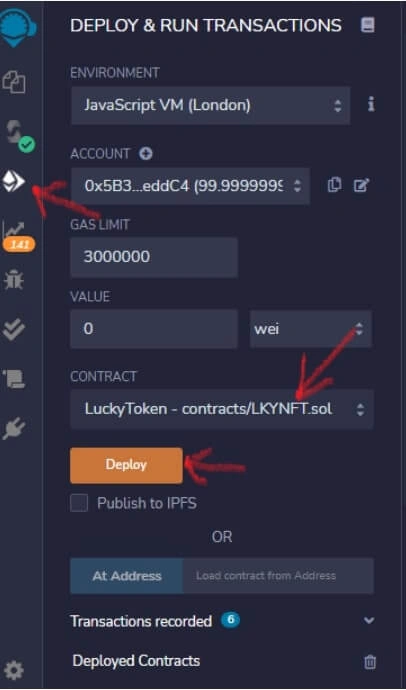
Validating the contract will take several seconds, during this time it will appear as pending. Once the transaction is mined, the number of pending transactions is updated and the transaction is added to the log. The successful transaction will have a green checkmark. You can click on it to reveal more information about the transaction as shown below.
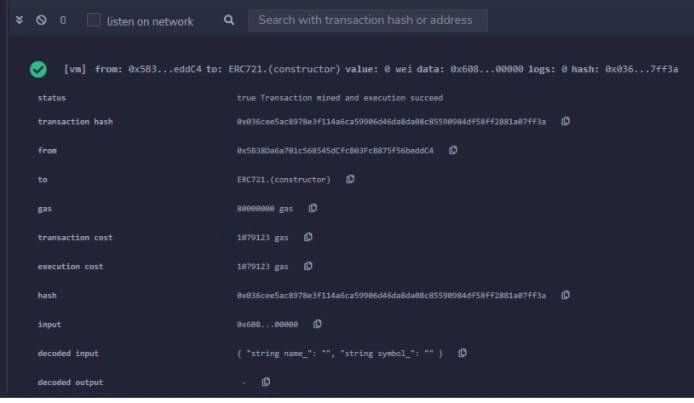
With a green checkmark, you'll have successfully written, compiled, and deployed your first NFT smart contract.
You can see the deployed contract by clicking on the contract under "Deployed Contracts." You can also test your contract by using the function buttons Remix provides based on the code in your contract.

How to Test Your Smart Contract
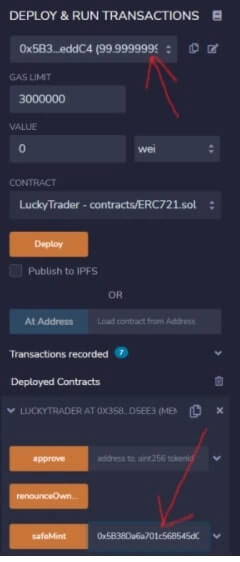
Now we're ready to test the contract. To test the contract you will need an account on the Remix blockchain sandbox. Fortunately, for testing purposes Remix provides five accounts. Copy and paste the account from the account box at the top of the "Deploy" and "Run Transactions" area, and paste this address into the safeMint box as shown below:
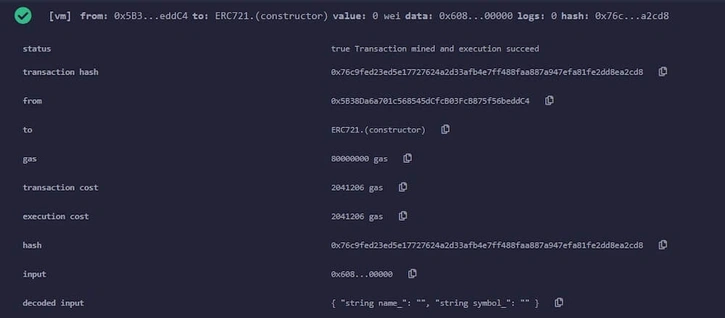
When you depress the safeMint button your smart contract code will execute on the Remix sandbox. If successful you will see a green checkmark. Clicking the debug down arrow will show you the logs of the execution:

Clicking the arrow above will show information about the transaction including the status of the function call, transaction hash, gas and transaction cost, and log information.
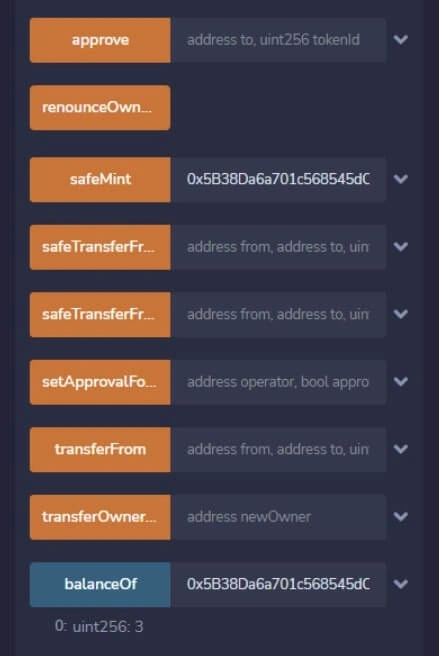
If you want to prove that you have actually minted an NFT to that account, just copy and paste the account number to the balanceOf function and depress balanceOf button. Once you've done so, it will return a uint256 value for how many NFTs you have minted to this account. In the case below, we have run the safeMint function to this account three times:
Congratulations! You have now successfully written, compiled, deployed and tested an NFT contract!
While creating a generative NFT project will introduce a few more complexities, this framework will provide you with the necessary foundation for building your own ERC-721 contract.
You can view the complete contract code from this example below.
// SPDX-License-Identifier: MIT
pragma solidity ^0.8.2;
import "@openzeppelin/contracts/token/ERC721/ERC721.sol";
import "@openzeppelin/contracts/access/Ownable.sol";
import "@openzeppelin/contracts/utils/Counters.sol";
contract LuckyTrader is ERC721, Ownable {
using Counters for Counters.Counter;
Counters.Counter private _tokenIdCounter;
constructor() ERC721("LuckyTrader", "LKYTR") {}
}
function safeMint(address to) public onlyOwner {
_safeMint(to, _tokenIdCounter.current());
_tokenIdCounter.increment();
}
}