How Do I Use Web 3.0: A Beginner's Guide to OpenSea

Want to buy your first NFT, but not sure where to go?
We recommend you start at OpenSea.
OpenSea, the largest NFT marketplace, allows users to explore, buy, sell, trade, and transfer NFTs to other Web 3.0 participants.
It has become a crucial part of the NFT ecosystem, and a necessary part of the technology stack for NFT buyers and sellers.
Below, we’ll give you a comprehensive view of OpenSea, and show you how you can set up an account, find NFTs to buy, and more.
How to Set Up and Navigate Your Account
Accounts on OpenSea, like nearly all of Web 3.0, are directly tied to your Ethereum address.
Therefore, to set up an account on OpenSea, you’ll need to have an Ethereum address and wallet with compatibility with Web 3.0 and decentralized applications. The most popular wallet option is MetaMask, but with OpenSea, you can connect with a handful of other wallet options.
Don’t have a wallet? Head to our comprehensive guide on MetaMask to get set up.
If you already have a wallet, you can head to OpenSea.io and connect to the site using the wallet icon in the top right corner of the page.
Security Tip: Be sure to bookmark OpenSea.io to ensure that you can quickly navigate to the correct site, limiting the chances at falling prey to nefarious actors.
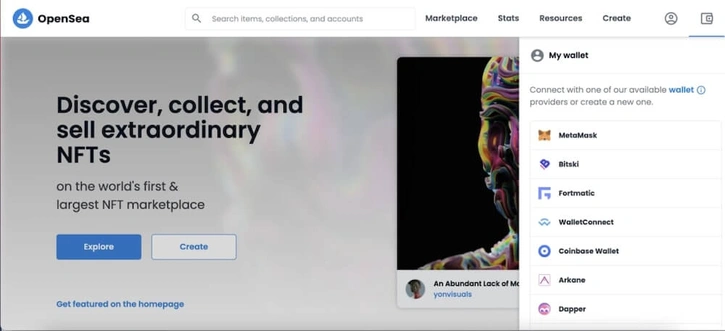
After choosing the appropriate wallet provider and following the connection steps, you’re now “signed in” to OpenSea.
From this step, you’ll now be able to view and edit your profile.
By hovering over, or clicking on the circle next to the wallet icon in the screenshot above, you’ll be sent to your profile page.
How To Edit Your Profile
Your OpenSea profile page will eventually be the home of all the NFTs you acquire. As you curate your collection, other OpenSea users will be able to navigate to this page, peruse your collection, buy NFTs you have listed for sale or make offers on the NFTs that aren’t.
If you wish to personalize your profile page, hover over the profile circle in the top right corner and select “my account settings.”
In the general account settings section, you’ll have the opportunity to name your profile for easier navigation, add your email for notifications, as well as attach a website or a social media profile to your account.
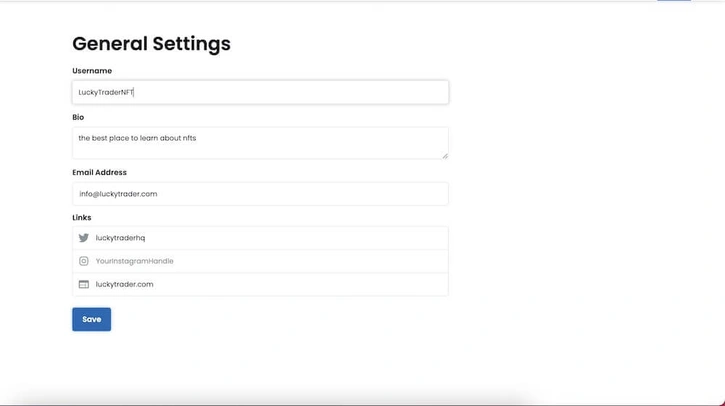
While a profile name is not required, with one attached, you’ll be able to quickly find your account or any other using the search bar at the top of the page.
How to Manage Your Notifications
Inside your profile settings, you can manage your notification settings as well. Assuming you’ve attached an email address to the account, OpenSea will allow you to create alerts for whenever you’ve sold an item, bought an item, or received an offer.
In this section, merely check the boxes that you wish to create a notification for and ensure you’ve verified your email address previously, to receive them.
It is important to note, you may receive a large amount of notifications regarding offers on your NFTs. At the bottom of the notification settings page, you have the opportunity to create a minimum offer threshold before an alert is generated and sent to you. Therefore, if you only care to receive notifications about offers of 1 ETH or more, setting this threshold to “1” will ensure you don’t receive any unwanted notifications.
How to Find the Perfect NFT on OpenSea
Now that you have your OpenSea profile established, it’s time to find an NFT that you want to buy.
Searching for an NFT on OpenSea is simple - use the search bar at the top of the page to navigate to a collection or specific NFT you have in mind.
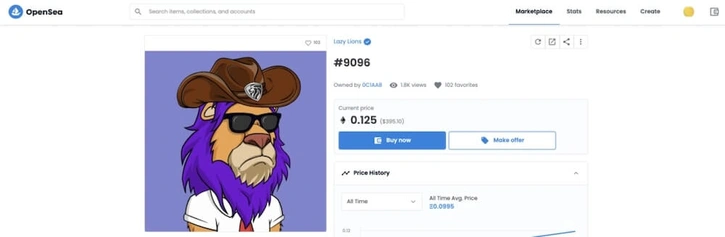
For example, if you wanted to look through the Lazy Lions NFTs, you can type, “Lazy Lions,” and a collection matching that description will automatically populate.
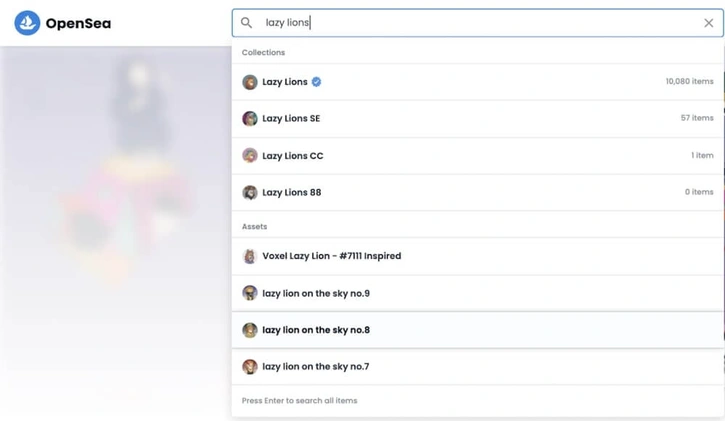
Security Tip: Nefarious actors will place look-alike collections on OpenSea that are not the real, verified collections. Ensure you’re selecting the right collection, and use the verified badge (blue checkmark) as a guide!
Upon loading, the Lazy Lions collection will be pre-sorted from the lowest price to highest price among the collection. But, if you can’t find anything that suits your eye, you can use the filter panel on the left to sort and find exactly the right attributes that suit you.
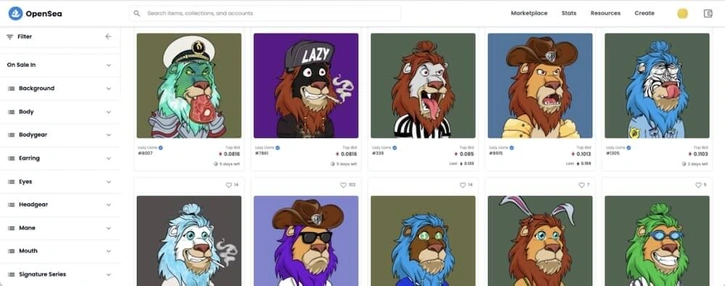
Selecting a particular attribute will automatically filter the collection, leaving you with only the Lions with the respective attribute you’ve chosen. Add on as many filters as necessary to find the option most suitable for you.
How to Buy an NFT on OpenSea
When you have found the perfect NFT, it’s time to buy it!
From the collection page, you can double-click an individual asset to be directed to the respective asset page.
On this page, you can view the entire activity history of this asset as well as the price history, any pending offers, and more.
To buy it, click “buy now" next to the asset image.
After doing so, your connected wallet will populate and allow you to confirm your wish to buy the NFT.
Here, you’ll also be able to edit gas settings if the purchase is time sensitive.
For more information on editing gas settings, please refer to our comprehensive guide on MetaMask.
Once the transaction has confirmed on the blockchain, the NFT is yours!
You can repeat this process with all of the NFTs on your wishlist. To show off all the NFTs that you’ve purchased, return to your account or profile page and now notice that all your NFTs are visible.
Advanced Note: When you are buying an item listed at “buy it now” prices, you as the buyer will be responsible for paying the gas fees to transfer the NFT.
Negotiating: How to Create an Offer on OpenSea
Don’t feel like paying the full asking price for an NFT? You can make an offer to the listed seller.
To make an offer, first travel to the asset page that you’d like to make an offer on.
Next to the buy button you can select “make offer.”
To officially create an offer, you’ll need to have Wrapped Ethereum (wETH) in your wallet. You can learn more about wETH here.
If you already have wETH in your wallet, you are then able to select the offer you’d like to make and choose the duration you’d like the offer to stand for. Be aware, if you do not cancel your offer, the buyer will have the opportunity to accept for the entire duration your offer is valid.
If you do not have wETH in your wallet, OpenSea will offer you the opportunity to swap ETH to wETH without leaving the page.
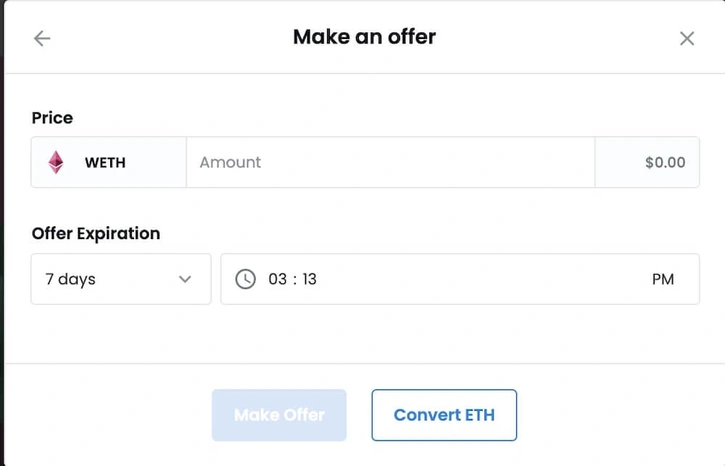
After you’ve made the swap, you can officially submit your offer using the same guidelines as above.
Advanced Note: If the buyer accepts your offer, they will be responsible for paying the gas fees, unlike when you are buying from a “buy it now” price.
How to Sell an NFT on OpenSea
If you’ve bought or received NFTs, there may come a time when you wish to sell them.
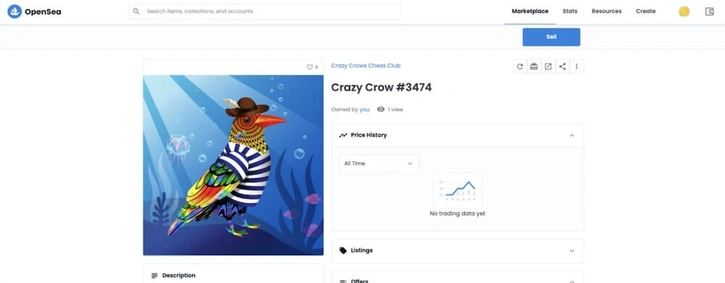
As hard as it may be to part with your Lazy Lion or Crazy Crow emotionally, it’s just a few steps to list them for sale on OpenSea.
First, head to the asset page for the NFT you are hoping to sell.
Hit “sell” in the top right corner.
After hitting sell, you’ll be presented with multiple ways to place your item for sale. We’ll go into more detail on the different options below. Choose the options that are suitable for you, and hit “post your listing.”
How to Initialize Your Wallet For Trading on OpenSea
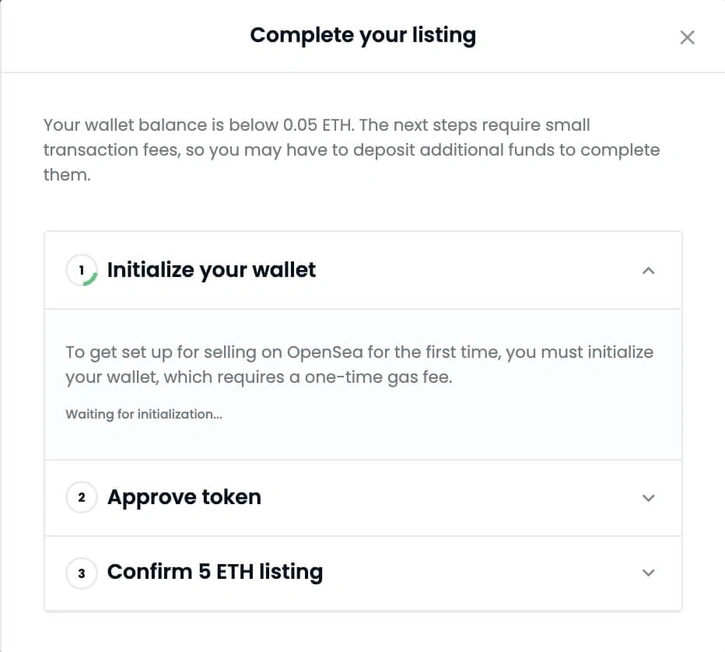
If this is the first time you are selling an NFT from this wallet, you’ll notice a few extra steps after hitting “post your listing.”
First, you’ll need to initialize your wallet for trading on OpenSea.
The wallet initialization process will automatically populate as you attempt to place your first item for sale.
To complete this step, you’ll need to complete a free transaction that does require a small gas fee. After you’ve initialized your wallet for trading, you’ll never be required to complete this step again, regardless of which NFT you are trying to sell.
How to Unlock Trading of a Token on OpenSea
Next, you’ll also need to unlock trading for the specific token you're trying to sell. Unlocking trading of a token allows OpenSea to pull the token (NFT) from your wallet, and transfer it to the purchaser. This will only be necessary one time per token collection.
Therefore, if you’re selling a Crazy Crow, you only need to unlock trading for Crazy Crow NFTs one time, for the first Crazy Crow that you list. After you’ve unlocked trading of the Crazy Crow token...you can list any other Crazy Crows you own without this additional step.
After you’ve completed the wallet initialization and you’ve unlocked trading for the NFT collection you’re selling, you will be asked to sign to confirm your posting. Once you’ve signed, agreeing that you wish to officially post your item for sale, your item will officially be listed on OpenSea.
Later, if someone buys it on the secondary market, your funds will automatically be deposited into your wallet!
Selling an NFT: Creating an Auction
If you wish to sell your item as an auction, you can select “Highest Bid” as your sale type from the options listed when attempting to sell an NFT.
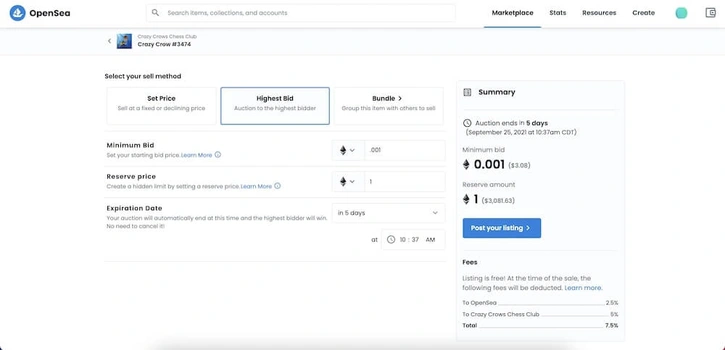
First select the minimum starting bid for the auction. This price will be the minimum required bid amount for the auction. The minimum starting bid is publicly visible.
After choosing the minimum starting bid, you’ll then have the opportunity to create a reserve price, or a price that must be met in order for the sale to go through.
For example, if you aren’t willing to accept anything below .25 ETH for a particular NFT, then you can set your reserve price as 0.25 ETH.
If no bids come in at .25 or higher, then no sale will take place.
As the seller, you will have the option to accept bids below your reserve price prior to the end of the sale, if you wish. The reserve price is secret and not publicly visible, however, from the asset page a user will be able to tell if the reserve price has been met.
Lastly, when creating an auction you’ll have the opportunity to set the auction duration. If the reserve price has been met during the bidding process, the sale will automatically take place at the end of the duration you’ve selected.
Selling an NFT: Creating a Private Sale
Make a deal offline and want to ensure only a specific person can buy your NFT? You can list your NFT as a private sale on OpenSea.
To do so, head to the asset page of the NFT you’d like to sell. After hitting “sell,” toggle on the “private sale” option shown below.

Once you’ve done so, you’ll be able to specify the price and the specified buyer’s address, ensuring that just he or she is able to purchase this NFT.
Advanced Note: During a private sale, the buyer will pay the gas for the NFT transfer, though the creator royalties and OpenSea sale fee still apply.
Selling an NFT: Accepting an Offer
Occasionally you may receive offers on NFTs that you have in your wallet. Because OpenSea will display all of your wallet contents, regardless of whether or not you’ve placed an item for sale, you may receive offers on any of the NFTs you own.
To see the open offers on an asset, you can travel to the individual asset page.
Here we can see the available offers, the offerer, the time left before expiration, as well as the offer strength, which indicates how far the offer stands from the floor price of the asset's collection.
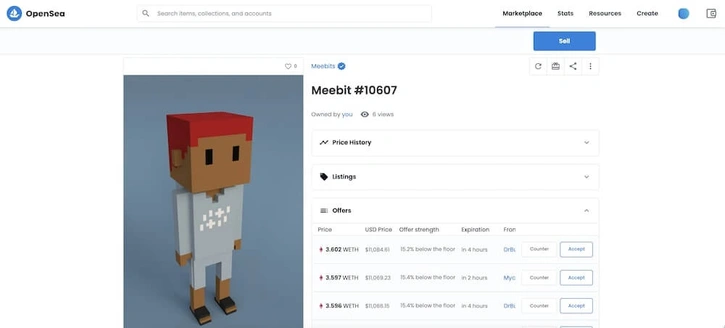
To accept an offer, simply click “accept” on the offer of your choice.
If you're not satisfied with the offer and would prefer to counter-offer, you can click "counter."
After selecting your counter-offer price, the offerer will be notified of your counter-offer and will have the option to accept or re-counter.
Advanced Note: As a seller, accepting an offer makes you responsible for paying the gas to transfer the NFT.
How to Transfer an NFT on OpenSea
Transferring an NFT to a different wallet address or to a friend can be done from the individual asset page.
Once you’ve decided which NFT you’d like to transfer, simply click the “present” icon in the top right corner of the asset page.
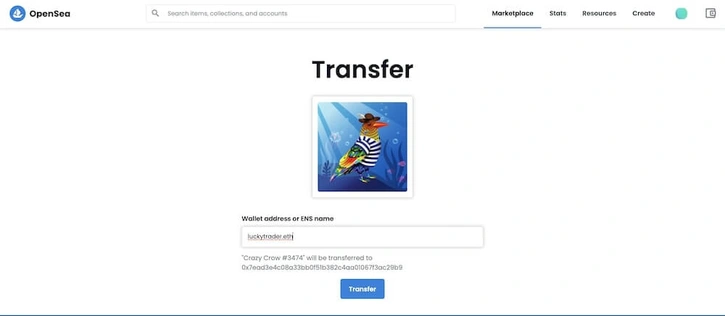
Once you’ve done this, you can input the Ethereum address of the recipient and click transfer.
Upon confirmation on the blockchain, your NFT will have been transferred to the address of your choice.
Now you’re ready to get started on OpenSea! For more information or a video tutorial, please refer to our videos page or the Lucky Trader YouTube.
Think something is missing from this guide? Send an email to info@luckytrader.com and we’ll update it to improve the experience for everyone.