How to Buy, Sell & Transfer Crypto on Coinbase

Getting started in web3 is a major learning curve. Understanding what cryptocurrencies are, where to buy and sell them, and how to send and receive them from friends and colleagues can be daunting for beginners. Fortunately, Coinbase offers a quick and easy way to start buying, selling, and transferring assets like Bitcoin (BTC) and Ethereum (ETH) in minutes.
A Brief Word on Custodial vs Non-Custodial Wallets
Before we dive into how to set up a Coinbase account to buy, sell, send, and receive BTC and ETH, let’s first briefly talk about custodial and non-custodial crypto “wallets.” If you just want to get started right away, skip to the next section.
A wallet, similar to the non-digital world, is where someone holds their money. In web3, a wallet holds cryptocurrencies (or NFTs) instead of USD or other fiat currencies.
Similar to cash, when cryptocurrency is in your wallet, you’re responsible for it. This is called non-custodial ownership of funds. If, however, your cryptocurrency is being held by an exchange or other centralized platform, they’re typically responsible for it. This is called custodial ownership of funds.
Why does this matter? Non-custodial wallets grant you direct ownership of your cryptocurrencies (think physical USD, a $10 dollar bill for example). No one can tell you where you’re allowed to spend that $10 bill (unless you’re breaking federal, state, or local laws, of course). But you’re also directly responsible for that currency. If you get tricked or scammed into giving it to a bad actor, too bad. That’s on you. Custodial wallets protect you from hacks, scams, and more by keeping your funds locked up and under their control. Similar to a bank, if the custodial wallet “gets robbed,” you typically have insurance to make sure you don’t lose your money.
Coinbase custodies cryptocurrencies, which depending on experience levels in web3, can be good. It keeps beginners safe and gives them a trustworthy way to get started in the cryptocurrency space.
How to Set Up a Coinbase Account
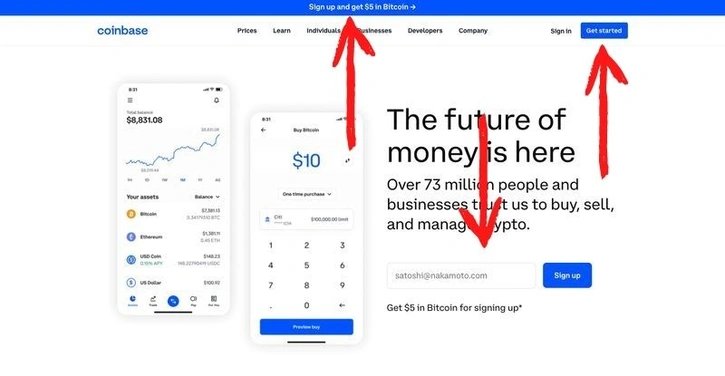
Getting started on Coinbase is quick and simple. First, head over to the official Coinbase website.
On the home page, there are three options to sign up for a new account. Click on the promotional offer at the top of the page, the “Get Started” button at the top right corner of the screen, or enter your email and click “Sign up” in the middle of the screen. In this example, we’re going to click the “Get Started” button.
In order to create your account, you’ll need to answer a few questions. First, enter your first and last name, email address, a new password, and the state you live in. Then, click “Create Account.”
If there is a promotional offer, it will show up now. Currently, that offer is $5 in “free” Bitcoin. Click “Continue.”
Next, you’ll need to verify the email address you provided. Coinbase will send over a verification email. Open it and click “Verify Email Address.” This will take you to a new tab in order to set up two-step verification for your new account. This helps to ensure that your account is not hacked and your cryptocurrencies are not stolen.
Enter your phone number and click “Send code.” Once you’ve received the text, enter the seven digit code and click “Submit.” If you didn’t receive a code, click “Send new code.”
After setting up two-factor authentication, you’ll need to pick your citizenship. Select the country in which you reside from the drop down list and click “Submit.”
Federal regulations require Coinbase to verify your identity. You’ve already provided your first and last name, but now you’ll have to also provide your date of birth, street address, zip code, what you’ll be using Coinbase for, the source of funds you’re using to purchase cryptocurrency, your employment status, and the last four digits of your social security number. Once you’ve filled in all the information, click “Continue.”
Again, Coinbase is legally required to collect additional information. Select how much crypto you expect to trade per year and the industry you work in from the drop down lists and click “Submit.”
That’s it. Your Coinbase account is set up and ready for use.
How to Buy Bitcoin and Ethereum on Coinbase
Once you’ve created a Coinbase account, there is one more step before you’ll be able to buy and sell BTC, ETH, and other cryptocurrencies on the platform: adding a payment method.
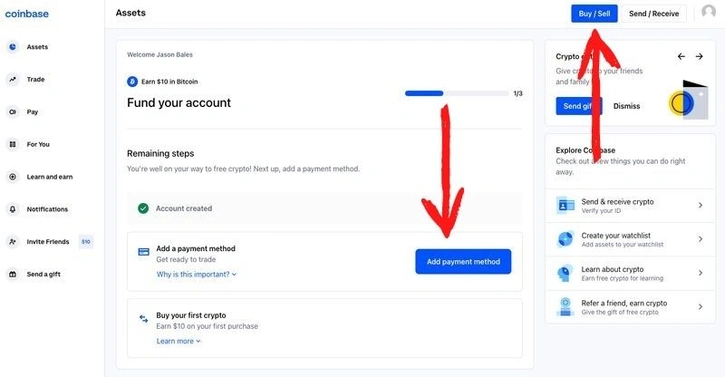
To do so, click the “Add payment method” button in the middle of the screen or the “Buy/Sell” button in the upper right-hand corner of the website. Then, choose from one of the four available options: bank account, PayPal, debit card, or wire transfers.
The debit card option is the only option with major restrictions on the amount of funds you’re allowed to transfer into Coinbase. Wire transfer is the only option without any limits at all. Each option requires information specific to that option. In this example, we’ll use bank account because it is the most common and recommended by Coinbase.
Click “Bank Account'' and then click “Continue” to allow Plaid access to your account. Plaid is a trusted data transfer network that powers fin-tech and digital finance products.
Next, search for your bank account. Choose your bank and enter your online login information. This should automatically connect your bank account with Coinbase for easy and quick transfers. If you don’t have an online bank account, enter your banking and routing numbers.
Now you’re ready to buy and sell cryptocurrencies on Coinbase.
To purchase BTC, ETH, or another cryptocurrency on Coinbase, click “Buy/Sell” in the top, right-hand corner of the website.

With your bank account information linked, you’ll see a buy screen with a few options. You can toggle between USD and BTC by clicking the up and down arrows on the right side of the popup. You can change the purchase type by clicking on “One time purchase” in the middle of the popup (if you want recurring purchases). You can change the type of cryptocurrency you want to purchase by clicking “Bitcoin” in the middle of the popup. And you can change the payment account you’d like to use by clicking on your bank’s name toward the bottom of the popup. Enter the amount of crypto you’d like the purchase (in USD or crypto) and click the “Buy” button.
That’s it. You officially own cryptocurrency on Coinbase.
How to Sell Bitcoin and Ethereum on Coinbase
The process for selling BTC, ETH, and other cryptocurrencies on Coinbase is as simple as the process for buying.
Click the “Buy/Sell” button in the top, right-hand corner of the website. Then, click “Sell” at the top of the popup.
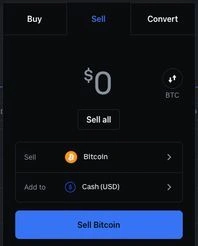
Similar to the “Buy” tab, you’ll be able to switch between USD and BTC by clicking the up and down arrows to the right of the popup. You can also click “Sell all” in the middle of the popup and Coinbase will automatically add all your available crypto to the transaction. Be sure to have the correct token (BTC, ETH, etc.) selected in the middle of the popup. Finally, click the “Sell” button.
After you sell, you can transfer funds back into your connected bank account.
If you’re looking to sell BTC (or any cryptocurrency) for ETH (or any other cryptocurrency), click the “Convert” tab.
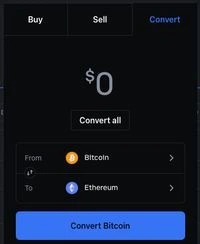
Select the amount of BTC you’d like to convert (in USD) and click “Convert Bitcoin.” You can change the “From” section to whatever you’re looking to convert and the “To” section to whatever you’re looking to receive from that conversion. This is easier than selling one cryptocurrency for USD and then using that USD to buy another cryptocurrency.
Sending and Receiving Bitcoin and Ethereum on Coinbase
Holding cryptocurrencies on Coinbase is a safe and minimally involved process for beginners, but to truly utilize the wide array of platforms and protocols across the Decentralized Finance (DeFi) space, you’ll need to move tokens to a non-custodial wallet. Coinbase does have a user-controlled, non-custodial wallet aptly named Coinbase Wallet. The most popular crypto wallet currently, however, is MetaMask.
At times, you might need to receive funds on Coinbase, too. Whether you’re looking to easily cash out of crypto to fiat currency or simply hold funds on a more secure platform, receiving funds on Coinbase is relatively simple and quick.
WARNING: Always send BTC to Coinbase’s BTC wallet, ETH to Coinbase’s ETH wallet, etc. Sending to the wrong blockchain network could lose your funds forever.
To send and receive cryptocurrencies on Coinbase, click “Send/Receive” in the upper, right-hand corner of the website. Similar to buying, selling, and converting, you’ll see a popup in the middle of your screen.
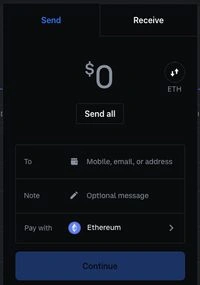
If you’re sending to another Coinbase user, you can enter their mobile phone number or email address in the “To” field. Otherwise, you’ll need to include a wallet address. Wallet addresses look like this: 0xBC4CA0EdA7647A8aB7C2061c2E118A18a936f13D (this is the Bored Ape Yacht Club [BAYC] contract address, it is simply being used as an example). Always copy and paste or scan the provided QR code (see below) when sending cryptocurrencies. Getting even one letter or number wrong will result in a failure to send to the appropriate address and could result in a loss of funds.
Also similar to buying, selling, and converting, you can change from USD to BTC by clicking the up and down arrows on the right side of the popup. The “Note” field is for special messages (for example, telling an employee this is their paycheck or a friend that this is for dinner last night). Finally, select the appropriate cryptocurrency in the “Pay with” field and click “Continue.”
You’ll be asked to confirm that transaction with two-factor verification.
To receive cryptocurrency on Coinbase, click on the “Receive” tab at the top of the popup.
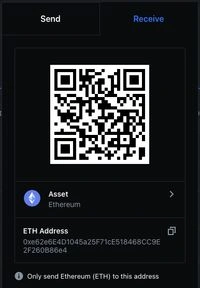
First, select the asset you’re intending to receive in the “Asset” field. Then, provide the QR code or (in this example) the ETH address to whoever is sending you funds. That person will follow the steps provided for sending cryptocurrencies, and that’s it!
You can now buy, sell, trade, send, and receive cryptocurrencies on Coinbase.