How To Use Uniswap

In our Beginner’s Guide to DeFi, we introduced the concept of a decentralized exchange. To reiterate, a decentralized exchange or DEX allows a user to instantly buy or sell cryptocurrencies without an intermediary. The algorithm that allows this to happen is called an automated market maker, AMM for short.
In this article, we’ll provide a comprehensive view of Uniswap, the most popular decentralized exchange on the Ethereum blockchain.
However, although the user interface may change slightly, the majority of the functionalities mentioned below can be found on other decentralized exchanges on other blockchains. For example, Raydium on the Solana blockchain, TraderJoe on the Avalanche blockchain, or PancakeSwap on Binance Smart Chain.
What Can I Do on Uniswap?
On Uniswap, there are three major actions that a user can perform.
Users can swap (trade) ERC-20 tokens, provide liquidity or create liquidity pools for trading, and vote on governance proposals. Below we'll walk through each example and show how the decentralized application functions.
How Do I Swap or Trade ERC-20 Tokens on UniSwap?
Like all decentralized applications that you interact with on web3, the first step is always to connect a web3 compatible wallet to the application.
On Uniswap, users can simply press the “Connect Wallet” button and then connect with any compatible Ethereum wallet.
For the purpose of this tutorial, we will connect using the MetaMask wallet as it’s the most used wallet on the Ethereum blockchain.
If you don’t have a MetaMask wallet yet, you can refer to our Beginner's Guide to MetaMask to get started!
Once you are connected to Uniswap, using the "Swap" functionality you can begin to trade ERC-20 tokens.
To do this, simply select the token you want to swap from as the top token in the swap interface, and use the bottom option to select the token you want to swap for.
For example, to swap ETH for USDC, you'd select ETH as the top token and USDC as the second.
Next, enter the quantity you'd like to trade or enter the number of the swap token that you'd like to receive, and Uniswap will automatically populate the other side of the trade.
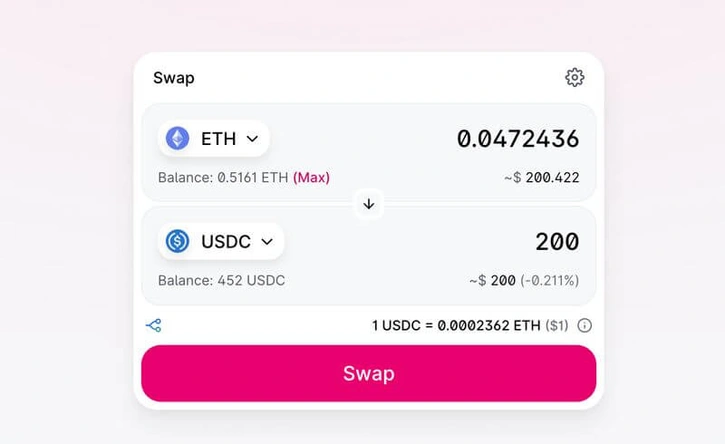
If you're comfortable with the trade amounts, pressing the “Swap” button will begin the trade. It's important to note, if you have never traded the token you are trying to swap from, you will first need to allow Uniswap to access the token.
If you have previously approved the Uniswap smart contracts to access your token, once you press the “Swap” button, you will then see more transaction details such as the Liquidity Provider Fee (the fee distributed to those who have provided liquidity that enable this trade) and the allowed slippage (which we will cover below).
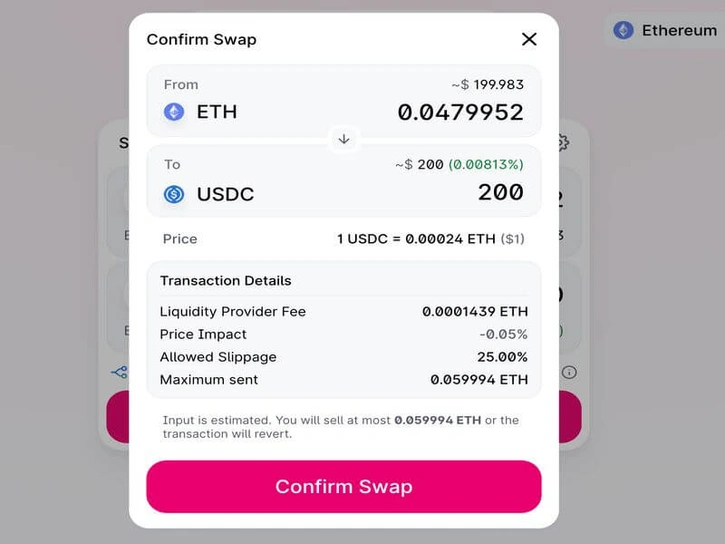
After pressing the “Confirm Swap” button, you will then be able to confirm and complete the transaction in your web3 wallet.
Congratulations, you have successfully made a token swap on the Ethereum blockchain!
What If I Can't Find the Token I Want to Swap For?
By default, only the most popular ERC-20 tokens are automatically recognized by Uniswap. However, sometimes you may wish to swap for a newly formed ERC-20 token or a token that is used in a game on the Ethereum blockchain. If you've tried typing the token name and don’t see it appear, don’t panic, there are ways to get around this!
In the token selection dialog, click the “Manage Token Lists” setting at the bottom of the popup.
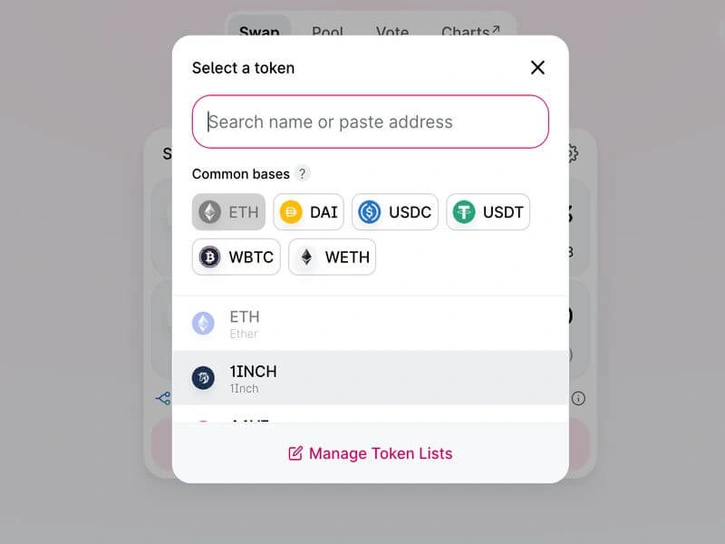
To add even more tokens to the auto-populated list, you can try turning on the token lists from sources like Coinmarketcap or CoinGecko and see if it will appear in the search bar. If this doesn't work, you can still manually add the token contract address to try and populate the result.
What is Slippage?
Oftentimes when trading cryptocurrencies the token prices can be quite volatile. One minute the token you are trading for can be worth $0.50 and the next it can be worth $0.05. This price discrepancy can create a major impact on your trade and is what we refer to as slippage.
Why Set a Slippage Tolerance on Uniswap?
On Uniswap, we can create a slippage tolerance that allows us to navigate through the volatility of trades.
Setting a slippage tolerance allows you to set the parameters of the trade that you're trying to make, ensuring that you don't end up trading a token for less than a particular percentage from the quoted price.
When trading with and for relatively low volatility assets such as stablecoins like USDC, using a low slippage tolerance, like the default 0.50%, is typically fine.
However, when trading more volatile assets, you may want to start increasing the slippage tolerance to ensure that your trade can still go through. Sometimes an acceptable slippage tolerance is in the range of 5-10%.
Why would you want to risk your asset changing up to 5-10% in price? If you leave your slippage tolerance too low and still process the transaction, you run the risk of the price moving beyond the bounds of your tolerance. If the price moves outside the range you've specified you're comfortable with, your transaction will be cancelled and you will lose the gas fees you utilized to perform the transaction.
How to Provide Liquidity on Uniswap
Another one of the key actions users can take on Uniswap is providing liquidity.
In normal order book models (like the ones used by centralized stock exchanges), bids and asks are provided by buyers and sellers to create trades.
However, in decentralized exchanges, this is done automatically through the automated market maker algorithm. To allow this, a liquidity pool is used so that the exchange doesn't need to find an individual buyer or a seller. Uniswap incentivizes users to lend their coins (lended to a pool of liquidity) in exchange for a prorated percentage of the fees when those pairs are traded.
To provide liquidity or "yield farm," you can use the "Pool" button at the top of the Uniswap application. Providing liquidity does present the risk of impermanent loss. For more information, please refer to our Beginner's Guide to DeFi.
If you already know which pairs you want to lend, you can go ahead and press the “New Position” button. If not, you can click on the “Top Pools” link to see what’s currently popular to give you ideas.
Once you know which pair of tokens you want to lend, you can go back to the app page and press the “New Position” button.
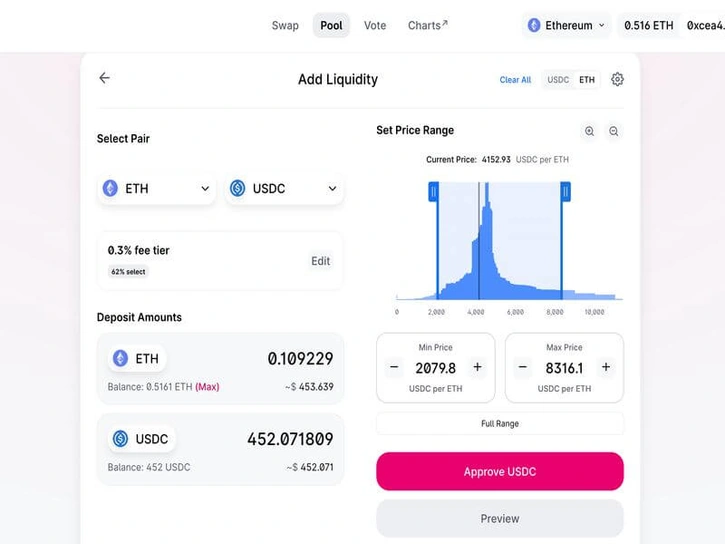
In this example, we will use the ETH/USDC pairing. It's important to note, when providing liquidity you will have the option to select the pair, your fee tier, and price range. We'll walk through each option below.
Notice, like with the "swap" function on Uniswap - if you have not already approved a token for use by Uniswap, you will need to first complete a small transaction giving the Uniswap smart contracts access to spend your token.
How to Select Your Fee Tier for Your Liquidity Pool
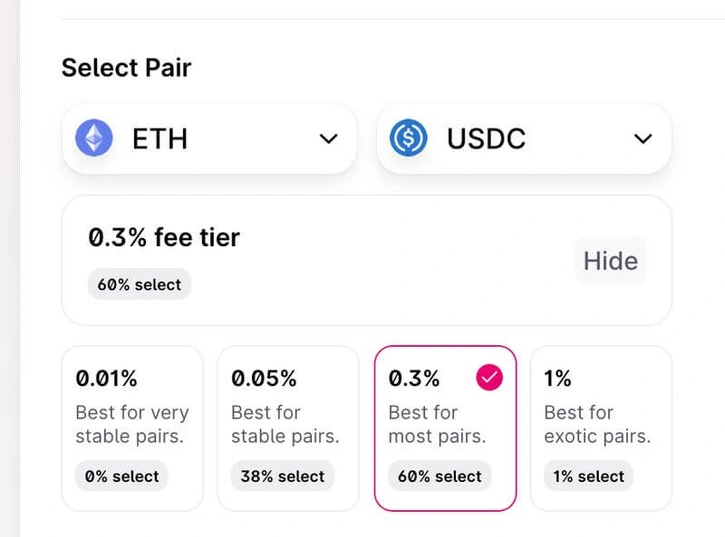
Once you select the pair, you can now select the fee tier. Fee tiers will determine how much someone else will pay whenever they want to swap the corresponding pair on Uniswap.
The rarer your pairing is, the more you can afford to charge since there is likely less liquidity being provided. However, if you're providing liquidity to a popular pairing, a higher fee will make users less likely to utilize your pool.
Uniswap automatically suggests which one fee tier you should select based on your pairing and also shows how many users have selected the other tiers.
How to Set Your Price Range for Your Liquidity Pool
Once you are done selecting your fee tier, you can now determine your price range. Setting your price range is a new feature that was recently introduced in Uniswap V3 (the third version of Uniswap).
Enabling the price range settings allows users to customize their liquidity pools and potentially receive a lot more in fee rewards if done well. The downside is that this also requires a lot more monitoring as well.
When you set a specific price range, that means that you are providing liquidity only for that specific price range.
As an example, if you would set your Min Price to be 3,500 USDC per ETH and Max Price to be 4,500 USDC per ETH, that means that as long as the amount of USDC per ETH is in-between that range, then you will receive rewards for providing liquidity. However, if the amount of USDC per ETH ever goes lower or higher than those amounts, you will no longer receive fee rewards.
This also means that if ever you set your price range in a range that is not selected by many others, and the price of the asset goes into that price range, you are likely to generate a higher yield while claiming more of the trading fee rewards.
Using the same example, if you would now set your price range to be 5,500 USDC per ETH to 6,500 USDC per ETH, that will set you in a less concentrated range of liquidity providers, potentially allowing you to capture a larger share of the fee rewards should the price get to this range.
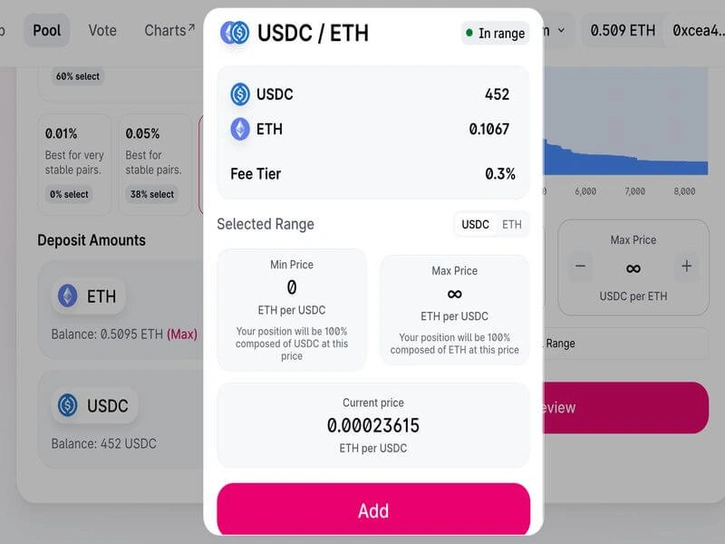
If you prefer a more passive approach and are comfortable with receiving lower yield, then you can simply press the “Full Range” button and it will set your price range from 0 to infinite, earning you fee rewards (albeit a smaller prorated amount) on any and all trades regardless of price.
How to Deposit and Provide Liquidity on Uniswap
Once you are done setting the price range, you can then select the amount you want to deposit. You will need to deposit an equal amount of each token in the pairing.
Once you are comfortable with all your settings, you can press the “Preview” button. You will then have a pop-up screen that will summarize everything you have entered.
To provide liquidity, press the “Add” button and then confirm the transaction in your MetaMask or web3 wallet.
How to Use Uniswap to Vote on Governance Proposals
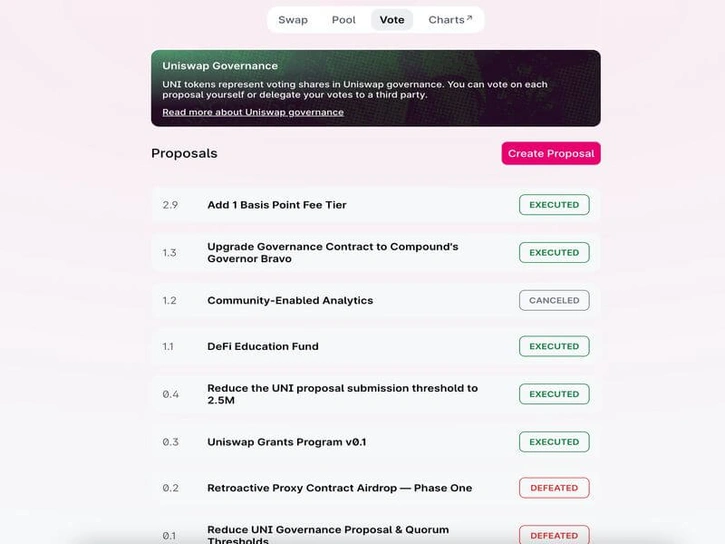
On September of 2020, any user who had performed a token swap or provided liquidity on Uniswap was allowed to redeem 400 $UNI tokens from Uniswap. UNI is Uniswap’s governance token, a token which provides governance rights or voting shares to token holders. Holders can vote on proposals about the future plans or changes to the Uniswap platform.
Using the "Vote" tab at the top of the page, users can see all the active, executed, defeated, or cancelled proposals. Clicking into each individual proposal will provide more details, the current vote status, and more.
If you wish to actively participate in the governance of the Uniswap platform, you can buy Uniswap on exchanges like Gemini or use the Uniswap exchange to swap for $UNI tokens.
Disclaimer: Lucky Trader is not a registered investment advisor. You understand that the service is furnished for your personal noncommercial, information, purpose only. No mention of an NFT in the service constitutes as a recommendation to buy, sell, or hold that or any other NFT. Nothing within the service shall, or is intended to, constitute financial, legal, accounting, or tax advice. Any decision that you make to buy, sell, or hold an NFT should be based on an assessment of your risks in consultation with your personal advisers.